How to set up DNS records for your domain in a Cloudflare account
The following steps walk you through creating a free Cloudflare account, adding an SSL certificate, and enabling DNSSEC.


Create a free Cloudflare account
- Sign up for a Cloudflare account.
- After creating an account, you are logged into your dashboard.
- On the top right, click the Add Site button.
- Add your domain name and then click the Add site button.
- A page opens displaying different Cloudflare plans.
- Under the Free option, click the Get started button.
- The next page lists your current DNS records at DreamHost.
The list may not show all of your domain's DNS records. Review all DNS records listed to confirm they are correct or if any are missing. See this article for further details.
See this article if you need to add any missing records.
- A message informs you that your domain is currently in a Pending state with Cloudflare. This means that it has not yet been verified with Cloudflare.
- The next page lists your current DNS records at DreamHost.
- Scroll down to the bottom and click the Continue button.
- The next page explains that you must update your nameservers at your registrar to point to Cloudflare, which is described in the following step.

Add the unique Cloudflare nameservers to your domain at DreamHost
If your domain is not registered at cloudflare , you will instead need to change your nameservers at the registrar where you purchased the domain.
- Log in to your account at Where you bought the domain name .
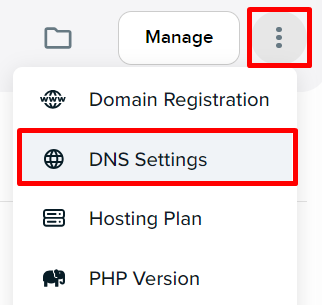
- Navigate to the Manage Websites page.
- Open the DNS Settings page:
- Scroll down to the Nameservers section and click the Change button.
- Click the I'll use my own nameservers radio button.
- Delete the three DreamHost nameservers and then add the two Cloudflare nameservers.
- Click the Save button.
- After you save the records, they will be visible on your domain's DNS page.
- Return to the Cloudflare panel and click the Done, check nameservers button.
- On the next page, select your recommendation options.
- The nameservers may take over 24 hours to fully update. Cloudflare informs you that you'll be emailed when the site is active. You can also click the Check nameservers button to initiate a manual check.
When the nameservers have updated, the Cloudflare panel will confirm your site is now protected.

Add an SSL certificate
See this article to learn more about how to add and configure an SSL certificate at Cloudflare.

Enable DNSSEC (optional)
At this point, your nameservers are now pointing to Cloudflare, and you can enable DNSSEC on your domain. This is optional but can help secure your domain. See this article for further details.
Locating your domain DNS records
The DNS records you will need to update at Cloudflare can be found in your domain panel. See this article for instructions on how to locate these records.
Updating DNS records at Cloudflare
See this article for instructions on how to update your DNS records at Cloudflare.
Waiting for DNS to update
After the records are updated, it will take several hours for them to update online. You can check the status of the updates using the following tools:
- What's my DNS?
- Viewing your DreamHost DNS records — The DreamHost DNS propagation checker in the panel.
Join the conversation